"We are the Glue, the Guild is the Mold." - Nabolshia Dark Lotus

WELCOME to the LAST GUILD - You WILL EVER need..SVHG!
REST IN PEACE: The SVHG HIGH COUNCIL - est 2008


NABOLSHIA is BACK! The Severed Hand Seeks PvPRpg players! That LOVE the game Ethos! Defend Horde Cities and Strongholds! Gain Achievements! Mounts! New Items! As pwning PvPVe players! A New Genere! In the WoW, on Velen! PST for guild invite!

Sunday, November 8, 2020

The Ancients

MISSION UPDATE:
The Severed Hand Guild has found a dead end, if we follow the DARK PATH of basing everything on PVE end game raiding as lvl 80+s, then this is a loss like every other guild. The truth would be is to STAND for who and what we are.

We ARE the HORDE, we are bent in a life long conflict against the alliance, and any other enemies that appear in the middle of this conflict are SIMPLY distractions. We are NOT to be distracted, nor are we to be TRICKED or FOOLED as to the direction that is the TRUE end to the means.

This is to destroy ALL ALLIANCE oppositions.

The Severed Hand Guild or SVHG is prepared for the future, to help defend and protect:

1) Low level starting zones pre & post CATA
2) Follow the SVHG code of ETHICS
3) Take FLIGHT as soon as possible (ASAP) to defend Cata starting ZONES.
4) Be a leader! Text me, Email me, in game me, whatever! Make the SVHG the DEFENDERS of the New Cata release as we can SEE that the flight NOOB zones will NEED to be defended. And if they don't, we have PvP BG - Arena's & World PvP (WPvP)!!! And it COMES in FLIGHT mode, if you have CATA flight and are PvP, let me know ASAP, to become part of the ELITE GUARD.

Life is ABOUT to change, welcome to the protective sheath of the SVHG, and their GOBLIN army.

IMAGINE:

The starter areas over run, by FLAGGED PvP players of the Alliance. And our ARMY of Goblins run in with their pathetic distractions @ lvl 60. Then as the FLAG zone is red hot, our LVL 80+ Flyers descend on them out of air, and destroy everything, be ready to the NEXT gen of WoW, join the SVHG.

We Need:

1) Good Leaders
2) Laid Back players that have GOALS
3) Raid Guides (guiding groups in BG & World PvP)
4) Nabolshia is a For the Horde Raid leader with 8/0 wins on all 4 cities in one run in 2 hrs.
5) Like minded people (no Drama) that know to recruit people that are ONLINE when they are
6) Loyal players to help make SVHG into the Velen World PvP name to fear in CATA.
7) Willingness to learn and not be carried through leveling.
8) Utilizing team work to make the guild succeed
9) Players BUILDING core groups all hours of the Day and night all over the world
10) I WANT players to be able to log on, ANYTIME, and be able to join runs for BG and world PvP, and instances if they are running for gear like in VoA, and ToC.
11) To make groups and use guild tools to inform other players of your events.
12) An application form is being created, apply for the SVHG here SEVERED HAND GUILD, the test will be based on SVHG history and origins, as well as PvE and PvP test questions, and inquiries about RPG aspects of Party movement and Attack methods. Be prepared.

Nabolshia Nabz Founder, Master & friend. SVHG 2006

Thursday, June 18, 2020

NEW CONSTRUCTS

You can say I am patient, and I generally am. I play wow as my escape from real life and I think the game is played better when it is looked at this way. We recently had some serious changes take place in the guild, and would like to regain control of what I consider a MINOR setback.

This guild has MULTI purposes. To level to 80, by gaining information and techniques from the more experienced players in our guild. The high levels are not there to RUN you around, in honesty you won't learn your class and how to play it by people just running you through things.

"Give a man a fish, he eats for a day, TEACH a man to fish and he eats a lifetime, and can now teach others to FISH as well..."

From LEVEL 1- 80 your goal is simple. Level, gain Xp through quests, run dungeons so you know what your job is in a group, as once you hit 80, there is no way around HAVING to work with other people to get the gear you want and need. So get used to running dungeons and getting to know your ROLE and powers in the groups. See the links to the right about leveling tricks and how to make money, these work as it is what we do to get what we need.

Every Rookie or Noob, is a potential MVP, (most valued player). The more you assist and share info, the better leader you will become, or even the better assistant you become. The choice is yours. We do not tell you what type of game or class or spec to play. Its your game! Its your guild! Recruit like MINDED people daily and you'll always have same level people to run with- if you can keep up with the pack.

Again, UBER runs for low levels are scheduled 1- 2 days a week, this is the time for low levels to take advantage and get assistance from higher levels. Sometimes high levels will randomly offer to assist you, that is fine. If your stuck on a party quest or a boss on a quest and need an assist, it is ok to ask. If you can't find someone to help, send a mail to me @ Nabolshia (in game).


At 80, you have a choice to either Build gear for PVP or for PVE. There are 80s that KNOW the game they want to play. We are about helping, not looking down our nose at people because they don't KNOW stuff, because once upon a time, we didn't know the stuff either.


Loyalty is the best policy, if your here just to be power leveled, we will notice. Thats not what we are here for, and generally people that think just about themselves, hit 80 and leave anyways, so we WILL not assist in that fashion. We take note of MOOCHES as well as A+ PLAYERS, read the Merit system to the right. You will be tagged if your following or breaking our CHARTER rules, and guild guidelines on assists.

You don't have to leave the GUILD at 80 to RAID, keep your raid saves to the GUILD! As we get more bench warmers we will create 2cnd and 3rd RAID groups. The same for PVP. The idea is we have a family, help one another along to get to 80, at 80 these people we have INVESTED in FEED our forces to increase our 80s numbers, making us a SOLID, self FED Guild structure. Every one of us, from level 1 to 80 and soon 85, are what makes the guild who we are. We supply ourselves with our OWN experienced and well group trained players that know their roles when the HEAT is ON.

The only person that can dissuade you from your goals and limit your potential, is yourself, either directly by getting in your own way, or by ACTUALLY listening to the nonbelievers that have themselves convinced its not possible. Show them they are wrong. Your an ALL STAR. Remember every MVP once was a Rookie, that was... once a nobody, they made themselves become that MVP, despite what others preached. We Preach to assist and to be an independent teacher of the BEST way to make this happen for everyone you come in touch with. Even non-guild members.

To NEW players- do not respond to whispers from people CLAIMING to be BLIZZARD or WOW admins, that are offering you things or telling you your account is screwed up. Never log your password and loggin on non-blizzard sites! This is how hackers steal accounts without having to work for it! Do not share passwords with friends! If you get hacked, it puts the guild in jeopardy, be safe! You can get an account loggin code reader for $6.50 on the wow site to secure your account from hackers!

Play YOUR game. Enjoy OUR guild! Share info as you can! Have fun! Welcome home to the SVHG!

Friday, October 29, 2010

The New World Order, SVHG!

NABOLSHIA is BACK! The Severed Hand Seeks PvPRpg players! That LOVE the game Ethos! Defend Horde Cities and Strongholds! Gain Achievements! Mounts! New Items! As pwning PvPVe players! A New Genere! In the WoW, on Velen! PST

Friday, July 2, 2010

Guild Bank Rules


The Guild Bank is a sanctuary for the ITEMS found by Higher level players when FARMING zones and the like, and then to ASSIST lower levels or other players, they DEPOSIT the items into the GUILD bank for other players to better themselves. All items in the BANK are donated, and are intended to help better players as they progress through levels. However, though the items are MEANT to help people, they ARE NOT intended to help players MAKE money, or increase their disenchant materials. There are RULES pertaining to BANK usage, and what is or is not ACCEPTABLE without getting demoted or BLACK marked on merits. The expectations are as follows, and ignorance to the Guilds expectations will not be an excuse for misuse of bank materials, you will receive demerits and be demoted immediately. Until Reformations can be made, or a balance of goods can be maintained.


GUILD BANK LAWS & REGULATIONS

Only Take Items You Can Use or Wear
If your character can not wear an item then do NOT remove it from the bank. If it is in a slot on a higher bank tab than your alt can reach, move it to a lower bank tab instead. That way I can see that the item was moved and then REMOVED by the proper CLASS for the item. All of this information is tracked under Log- on the Bank tab, read the notes section under the bank tab to find out more information, and guidance. If it is higher level than what you can presently wear that is alright, that is not an issue, the issue is removing gear and items that are not for your class or your professions.


DO NOT remove items for ALTERNATE characters
Again, removing items for your alt with a higher level is not permitted. Instead move the item to a lower bank slot that your alt can access. If you have reached the with withdrawal limit, let a higher level know or an officer or admin and have them grab it for you when they can.


DO NOT remove items for RESALE
Removing items that you can not USE is a sign that you are FARMING our bank. When this is detected you will be demoted and receive a demerit. As per the Demerit rules, 3 strikes and you are banned from the guild and put on the GM's ignore list, which bans all of your alt accounts from being recruited, even if you trick another player into bringing you in. An ignore is an account ignore, and if placed on you by the GM, it effects all attached accounts.


DO NOT remove items to DISENCHANT them
Do NOT remove items from the guild bank to disenchant them. This is also a violation of the Guild charter, read the information listed on the right column of the guild web page- "how to make money" and also the info on the best profession tricks and tips. Do not use our items in the guild bank to level your enchanting skills or to get materials you need. Again you will be receive a demerit and flagged as a thief. Do not do this to yourself.

A Last Note about Bank Items & Raid/ Battle Group Armor Repairs
The gear is tracked, and anything that is not used within a certain time period is taken by a trusted ADMIN or by the GM and liquidated, this money goes into the guild coffer and allows for guild repair. Guild repair should also not be abused, and if in a battlegroup or raid, should only be used when on guild dungeon runs or raids.


Bank Slot Index (BSI)

Slot 1 - For up to level 40 items and gear - Guild Tabbards and Glyphs
(Purchased by Volos)

Slot 2 - For MATERIALS only
(Purchased by Faiyth)

Slot 3 - Level 41 to 69 gear & Receipes
(Purchased by Nabolshia)

Slot 4 - Level 70 to 85 gear & Chests (i.e. Lockboxes) & Enchanting Materials
( Purchased by Loche)

Slot 5 - Not Active
(Does YOUR name go here?)

Special Thanks to all those that try and make this the best Guild Possible! Treat the guild bank as you would want your Bank to be treated, and there will be many happy years to come. SVHG!

Nabolshia Dark Lotuc (Founder SVHG - est 2006)

Dungeon Party Mechanics


In the World of Warcraft, Dungeons Mechanics becomes very important for a group to make it through instance areas without headaches and expenses caused from unneeded deaths and party wipes.

Each player in the 5 man group fills a certain role in the group, that increases their overall success rate and survivability. The entire unit is held together by two main factors, the Healer, and the Tank or Front man.

It is the healers job to keep the Tank up and alive, so that he/ she can keep the attention of the enemies with various abilities to invoke fear in the targets. By the Tank holding the front line in place, it allows the other players more freedom of movement to avoid environmental hazards or grounding effect spells that might be caste on the group by a Boss.

A solid group knows their role, and what they can do to overcome obstacles that may sprout up along the way, such as additional patrols, or dealing with assistant monsters (mobs) that may appear once summoned into the area by a Boss your fighting. Area effects can pose a danger to a war party, and it is good to have a player in the group that may have prior experiences in the particular area you are running.


Below is a Map Mechanical Diagram of a Typical Battle Group made up of 5 Players

INDEX

Colors:
Green Circles- Range Dps w/pets

Green Box- Healer Focusing Tank
Red Box&Dot- Tank, Ground Zero
Purple Box- Range Dps/ Casters
Tan Box- Melee Dps/ Front Liners
Blue Box- Enemy Monsters (Mobs)
Blue Box Red Dot- Secondary Targets
Blue Box Yellow Dot- Main Target
Green Boxes marked P- Pets

Letters Correspond to the Type of Class involved in the Party: R in a Green Circle is the players teams Range Dps, that have pet control as a secondary skill. The blue squares marked with an R are secondary Mobs that are running or casting inward toward the group, and are not being held by the Tanks aggression, or AGGRO.

The Party Mechanic's Made Simple

Class Jobs:
Tank- The main glue of the team, it is their job to keep ALL mobs in one spot, and away from the others.

Healer- Wants to FOCUS mainly on the Tank, and keeping them ALIVE, if the Tank falls then the Mobs will break free, a SECOND Tank will have to try to grab their attention, or the Mobs could WIPE the group. The Healer then Focuses the STAND in TANK until the Mobs are Dropped, or the main TANK can be resurrected back into the FIGHT.

Range DPS- As a range Dps Caster that does not have the added power of a pet or minion, it is generally in your power to focus on the TANKS MAIN target and help burn it down, UNLESS the tank or the fight calls for other RANGE maneuvers. There are many dungeons, where enemies can only be reached by range damage, or certain things need to be avoided or dispelled from a distance, this is the job of Range Dps. On some classes, there are also crowd control effects, and cures that are not available to other classes that you may need to use to make the group more survivable.You also stand back by the healer as safe distance away, and are expected to lure any attacks away from the healer and then back to the TANK if at all possible. You can also use crowd control effects such as ice for example, to allow the healer to run to safety.

Range Dps w/ Pets or Minions- Range Dps that have pets or minions are good as they can focus on secondary targets such as casters that are out of the TANKS aggro range, or to chase down enemies as they try to run away from the Tanks AGGRO zone. You can use pets to get enemies off the Healer, or to assist if one of the Range Dps is under attack and struggling. Using a pet takes skill and practice, you want to be conscious of what it is doing and know how to change targets and control it as if it is an extension of your own powers. As an example, you would put your pet on aggressive in a PVP situation, but in a Dungeon you want it on defensive or passive and hand select its targets to avoid pulling enemies in on the group unexpectedly.There are different grades of pets, such as TANKING pets that wok LIKE a tank, and DPS pets that are range or melee, you can also get exotic pets that have strange powers, such as spider webbing or spitting acids and the like. Pick the pet that's best for the job at hand, ask the party leader what will be needed, and your pet can fill a valuable gap in your group.

Melee Dps- These guys are the TANKS right hand man, they either chase runners that try to run away from the tank and bring them back, or run to defend the healer or other range attackers that might be getting overwhelmed. These positions main focus is to focus the TANKS main target unless told otherwise, to help burn it down as fast as possible. If the TANK falls, the first move of a good melee, is to change to a CLOSE tanking posture ASAP, and try to hold the mobs from moving past them. If you can do this, the healer should change healing to you to help keep the front line alive.All other melee and DPS should focus on the main target of the SECONDARY TANK to help burn the mobs down and not pull aggression from him. Secondary healers or other classes with ability, should attempt to resurrect the main tank as soon as they can, or take up the slack for healing so they can REZ.

SOME TIPS:
Warlock Life Conversions:
Warlocks should inform HEALER to not heal them if they are MANNA Tapping, tapping out their life for manna, and then draining life from enemies to refill their life bar. The Healer should not be expected to heal a warlock that is doing this, the warlock should be draining enemies of life and not expect heals.


Secondary Skill usages:
When in doubt, dish it out. If you have the ability for secondary anything, whether it is Dps, or heals or even dispelling and the like, do it. If you see that the group is lacking something you can make up for - do it. Do not hesitate to inform the party that the heals are low and you have been assisting, or that the tank is tanking too much punishment or not holding aggro, and your having to assist to keep things in check.

Party Leaders:
A party leader is the one that knows the dungeons and the fights the best, and does not have to be the Tank or the Healer. You don't need a role to be a leader, I have been the lowest level in a PvP battlegroup and ran us to victory, a good leader does just that. Leads you to victory, watches that the party is prepared before a fight, checks manna on the healer, and asks before running into battle. This can save alot of frustration down the road as mobs are pulled and the healer is out of manna, or 2 dps are afk. Think before you strike, and always watch the teams manna and life levels before moving forward.

Cards Up your Sleeve:
If you have some BIG BANG effects Like Aoe (are of Effect) spells, be sure to use them efficiently, when large numbers of TRASH Mobs (low levels or add on groups) appear, don't waste it on a single target attack it is inefficient and will burn manna fast. Big POPS such as an 80 mages Clone or a Dks Army of the dead, or a Druids Tree, should be deployed before character altering effects are released by the boss to avoid spell interrupts. Keep your BIG spells for the boss and it will increase your DPS output efficiency!

Saturday, May 29, 2010

Merits System


A new Merit System is being put in place for Officers to track "Good" and "Crappy" players in the guild. 

Bad Merit X
When a player is out of line, breaking rules or being blatantly negative, put an X in the officers note. If it is something that needs to be addressed, do so, and snap a screen shot of the text by hitting {print screen} then open a paint doc and ALT+V and paste it in there and save it. This can be used in the future, if they are really bad ignore them and report the issue to a High Councilor.

Good Merit +

If you find an above and beyond player, add a + to their officer note. This is to indicat6e this is a good player. Whenever you think a player is good or bad, check the officer note at the beginning. As an example three +++  would mean they are a very helpful and friendly player and will be more likely to be trusted with promotions down the road.

$ Advanced knowledge
This player has advanced experience in the game, and can be asked about mechanics

% Questionable Practices
This is a questionable player and may have alternative motives, and has been caught instigating confrontations or trying to manipulate guild access or services, This includes but is not limited to, FARMING the guild bank, or invoking guild chat arguments, constant spam and insubordination to officers, and promoting distention among other players and ranks, not limited to tyranny. This is anything negative in relation to guild social economics, and tranquility as a whole.

Public and Officer notes:

On all standard players we need to mark who recruited them. Place it in the public note if your not an officer, for officers they would put it in the officer note at the start. I go through them all once or twice a week and readjust whats needed.

Admin and the GM have the ability to add or remove officer notes to prevent note tampering.It is the job of leaders to report player behavior directly to an ADMIN or the GM to have the merits changed on a toons account, this guarantees accurate readings and feedback on players attitudes by the leadership.


Know we are watching and looking for the BEST of the BEST!

Sunday, May 23, 2010

What the Guild Expects of You

All Members are expected to do the following:

1)  Help others when you can
2) Recruit Same level, like minded people daily
3) Loot Everything
4) group with same level players when you can
5) Be polite to others in Chats
6) respect the leadership
7) be here to be positive, and have fun- not complain and whine (we all have suffered)
8) Ask for HELP when your STUCK, or need info
9) Take advantage of Uber Run Saturdays, where high levels run low levels, its helping day 3 game time
10) Have fun, whats the point otherwise?
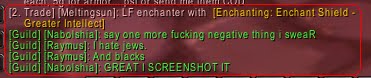
11) Mute and report violators or people that disrespect in chat, take a screen shot and save it
12) Treat all people equally
13) Keep real life (RL) in Real Life, don't bring it to my playground

What Happens to Bad People


This is the Text the player was spitting out and I took a screen Shot saved it and muted him... He had me worked up already as due to attitude and was about fed up..... so~


Then I got a witness statement that he continued after warned....

 Reported it to the guild and before the meeting could happen, he left the guild. We would have kicked him for this behavior. Our guild is about being positive. We understand things happen, hacked accounts, not getting items, struggling with Blizz tech support. The guild cant do anything to help these situations, don't get us involved other than to let us know so we can file a ticket too if we can help through doing that. Please, keep hate, judgments and your dislikes of things out of guild chat. be positive, we will take notice. Alot of us come into wow to escape reality and drama, don't bring it into MY sandbox. Go somewhere else and be a drama queen and negative, we don't want to hear it.

Nabz

Friday, May 7, 2010

SVHG CHARTER


The Severed Hand Guild or SVHG, is a Helper and Leveling Guild that aims for production training, gold farming and skill leveling over many games.

Created in Runescape in 2006 by Nabolshia after encountering MEAN players that would lure helpless people into PvP and then loot them, the SVHG became a symbol of equality.

The SVHG rules span over all games and servers with a standard base philosophy. We do not CARRY people with money and leveling, but instead assist when stuck and instruct the best ways to get desired end results to your character while providing a healthy Guild chat environment that promotes growth and teamwork through a Guild structure.

A guild is an association of craftsmen in a particular trade. The earliest guilds were formed as confraternities of workers. They were organized in a manner something between a trade union, a cartel and a secret society. They often depended on grants of letters patent by an authority or monarch to enforce the flow of trade to their self-employed members, and to retain ownership of tools and the supply of materials. A lasting legacy of traditional guilds are the guildhalls constructed and used as meeting places. The modern patent system was set up to break the power of the guilds.[citation needed]

Helpers, teachers and trainers are the most revered in our guild across all worlds. The reason for this is that you need trainers to train new people so they can one day become trainers as well.

Basic Rules of all SVHG Members:

1) Noob is a BAD word, it is hurtful to some people. We live by this philosophy, a noob is a rookie, and every MVP starts as a rookie. You have to walk before you can run. I can say I am a noob at some things and it is not an issue to me, but the word noob can be hurtful to others, try not to use it.

2) Real Life (RL) talk about Politics, religion and race are NOT permitted. We are in these worlds to have fun, we all have different opinions, lets not bring the seperationalism of reality and its hate into our game, we are here to have fun, leave the RL world out of it. DO NOT talk about religion, race or politics in open guild chat, it never turns out with a good and happy ending.

3)Group with people your level whenever they are on the same time as you. Whether its questing together or dungeon runs and the like. You make your life and others lives easier if you use one another's abilities to your advantage, team up and party together whenever you can.

4)High level characters are EXPECTED to assist lower levels on a weekly basis. Whether on dungeon runs, farming dungeons for gear or helping on a quest someone might be stuck on. Be a leader, set the example.

5)Don't harass high levels for assistance constantly, their job is to assist and teach, NOT carry you through the game. Learn from leaders and understand they have a character to level themselves, and life isn't easy for the Ubers in any MMO, show them respect. If they say they are tied up, respect it.

6)Whining and fussing about leveling or or your lack of money will not be tolerated. no one likes a whiner, everyone else grinded their way up just like you. They don't need to hear of weaklings that can't do the same. Take the advice we give and you won't have worries about leveling or making money.

7) Have fun and experience this exciting new world, whichever one it may be.

8) Recruit like minded people DAILY, a guild is only as strong as its weakest member. People that do not recruit and whine there's no one ever on when they are are negative. If you want more people on when you are recruit people when your on. Then when you log in you have like minded people to game with, share information and help one another through rough spots.

9) Be proud of the SVHG. Yell our name in zones to let it be heard, we are a family of gamers that want to enjoy and learn and grow in the games together! yell it loud and proud! SVHG!

Saturday, April 10, 2010

Tuesday, April 6, 2010

Warrior Quests

The warrior quest "Brutal Armor" is obscure, it asks for a number of items, but not where to get them, or who to get them from. Here is that list.

0/15 Smokey Iron Ingot
0/10 Powdered Azurite
0/10 Iron Bar
0/1 Vial of Phlogiston

0/15 Smokey Iron Ingot
You get these by traveling into Stonetalon mountains from Cross roads in Kalimador.It is the first left heading north from Cross Roads area, and will lead you past a tower into a rogue Taurren zone. Once inside you will see your first right, travel there to Windshear Crag, directly to the south of the area name is a Cave. In this cave are Windshear Diggers, Overlords, and the like, slay them to get your 15 Smokey Iron Ingots.

0/10 Powdered Azurite
Head to Tarren Mill and then ride south west toward the mines below the quest areas, these are the same mines from the Tarren Mill miner quests. Kill the number you need until you get the needed items.

0/10 Iron Bar
have to be mined or bought, if mined you need level 125 smelting to smith them into bars.

0/1 Vial of Phlogiston
Go south of Cross Roads to Razer Fen Crawl which will be on your right. Once inside bar a left, you are looking for Roogug for the item you seek. Take an immediate left once entering the dungeon itself. Then you go across a vine bridge and see a group near a cauldron, slay them and bare a left again and the target will be there with some guards, take them out and the quest items are done.

Once you turn this in you will get another series of quests that are now going to run in threes:

The first wave of them take you to the warrior trainer agents in the field that are going to help you build your gear in Thunder Bluff, Durator and Undercity, once these are turned in you'll get the following:

Chimeric Horn: Which is hunted in the Charred Vale of Stonetalon Mountains by killing the Chimera Matriarch that is just to the left when entering the zone from Sunrock retreat.

Satyre Hooves: Which are just North on the road from Splintertree Outpost in Ashenvale.

Dragonmaw Shinbones: Fly to Arathi highlands and then travel south on the road to the dwarven pass there, this will lead you into the alliance wetlands. In this zone travel to  the south on the road as you enter the wetlads you will stop when you get to the split in the road. Leave the road and head toward the back side of the muntains on your right of the south west, you will see the dragonmaw, when you kill them they will drop bones, right click these bones in your bags so that they count toward your collection.You will have to gather many of these as when you convert them not all will turn into STURDY Shin Bones.. you will have to gather more than what the quest is requiring.

Follow your quest markers and turn these in in the same order you got them, if you have a Dalaran port take that, go to Undercity (turn in) and then fly to Orgrimarr using the Zeplin and then ride to Durator (turn in) for your turn in there and then ride to crossroads to get the flight point to Thundebluff (final turn in). Done.

Sunday, March 28, 2010

What should be my first Toon?

In wow there is a built in level of difficulty. The common sense ones are differences in "survivability"and this is effected by armor and having stealth, adaptation or pets.

Saturday, March 20, 2010

Where to get Nether Drake Mount

Once you have done the quests and have gotten exalted with the Netherwing Faction, you might get stuck and wonder where to get Nether Drake Mount? First you will need Epic Flying already, but can use a standard flying mount to do the quest, though I don't recommend it.

Netherwing Faction

To get your nether drake you will first need to travel to outland in the shadowmoon area in the south east. It is located east of Shatterath. You will then travel to the most north eastern part of that zone, just north of the black temple. Get your flight point and then fly south along the fortress walls until you get to an area full of dragons.

The Quest Line


HATED to NEUTRAL (Day 1)
  1. Travel to Shadowmoon Valley and seek out the NPC called Mordenai. He can be found wandering here:
  2. Accept the quest [70] Kindness (shareable). Around Mordenai, in that area full of crystals, you will see mobs that are called Rocknails. Now you have two choices:
    • Kill the smaller ones. They will drop an item, of which 5 can be combined to one carcass.
    • Kill the bigger ones. These drop entire carcasses.
    After obtaining a carcass, place it on the ground (try to place it at a spot where you see dragons flying above). The dragons will come and eat the carcass. Repeat this step 8 times.
    However be careful:

    • Do not have any similar buffs as Lightning Shield on you. Those will cause the dragons to attack you.
    • Do not place the meat at the same spot twice. Once the drakes have eaten they get a "full" debuff and they won’t come eat again.
  3. Go back to Mordenai and turn the quest in.
  4. Next accept the quest [70] Seek Out Neltharaku from Mordenai. Neltharaku roams in the same area, above in the skies. Get on your flying mount, find him and turn the quest in. You must be about 10 feet below the dragon to be able to speak to him.
  5. Next accept the quest [70] Neltharaku's Tale from him. After accepting this quest, talk to the dragon again and go through the dialogue with him. (listen to his story) After you are done listening, turn in the quest.
  6. Then accept the quest [70] Infiltrating Dragonmaw Fortress. Now in the same area there is a fortress at 66, 60.
    Kill any of the orcs you see here, you need 15 kills to complete the quest.
    Return to Neltharaku and turn the quest in.
  7. Now accept [70] Netherwing Ledge from Neltharaku. In this quest he sends you to the Netherwing Ledge, which is just below the area you are at:
    Here you'll need to look out for plants with big thorns that have red crystals attached to them. The plants look like this:

    If you are a miner you'll be able to detect them with "Find Minerals".
    Loot 12 crystals and return to Neltharaku.
  8. Accept the quest [70] The Force of Neltharaku. The dragon will give you an item called Enchanted Nethervine Crystal. At the Dragonmaw Fortress you'll see hostile dragons (68,60), which are enslaved by orcs. Several things:

    • You must be out of combat to use the crystal, this means clear the area of any orcs (that aren't linked to draogns), approach one of the NPCs with a dragon (without aggroing it) and use the crystal on the dragon.
    • The dragon takes about 2 seconds to turn green (friendly) towards you. Wait until he turns green! He'll then attack his former master and you can join him and attack the orc as well.
  9. Free 5 dragons and return to Neltheraku.
  10. Turn in the previous quest and get the follow up: [70] Karynaku. The quest objective is to seek out Karynaku (the big blue dragon at the Dragonmaw Fortress). Once you've found him turn in the quest.
  11. For the next step you should optimally have a full group (healer, tank and 2-3 dps). Now follow these steps (courtesy to Arcticwolf from wowhead, thanks!):
    Step 1) Clear both of the Enslaved Nether Drakes in the area.
    Step 2) Clear both rooms left and right of the Shamans inside of them.
    Step 3) Have your group's tank initiate the fight by accepting the quest, and then quickly run over to where Zuluhed Spawns
    Step 4) While Zuluhed is talking, everyone else in the group move into the room that you cleared FIRST.
    Step 5) As soon as Zuluhed stops talking, have the tank attack him and then move him into the room where you begin to DPS.
    Step 6) DPS Him hard and move out of his Rain of Fire. When he spawns a Demon Portal, everyone in the entire group run as fast as you can into the other room, have your main tank run out first so that he takes all of the gunfire from the archers.
    Step 7) Once he's in the next room, the demon will spawn from the portal in the previous room, but will NOT aggro your group because he isn't near you anymore. DPS hard on him at this point because soon he will create another portal, and this time you will have nowhere to run to.
    Step 8 ) Once he's at low health, he'll turn into a big demon, but he's still easymode, just DPS his down, and you'll be fine.
    Step 9) Loot the key, and unlock the ball and chain around Karynaku's leg.
    Step 10) Talk to her, and then you get to ride on a bigass dragon all the way back to your sweet quest rewards!
    Additional info:
    Only one person of the group needs to use the key, and the whole group will get a quest complete message. This means that the rest of the group will keep their key. If you keep the key this way, you can complete the quest for someone else at a later point.
  12. After having accepted [70] Ally of the Netherwing from Karynaku, he'll return you to Mordenai on his back. Complete the quest at Mordenai. You'll receive 42000 reputation with the Netherwing; this will make you neutral with said faction. Also you'll be able to choose one of the following rewards:

Now, the next steps consist in hard faction work. However to be able to get to the next part, you need to have 300 riding skill (fast mount).
NEUTRAL to FRIENDLY (Day 1)
  1. Go back to Mordenai and get the quest [70] In Service of the Illidari. Mordenai will send you to the Netherwing Ledge, where you can find the Netherwing Encampment. After talking to Mordenai you will have an orc illusion which will permit you to talk to the NPCs in that camp, however be careful, the hostile guards that patrol the camp see through your disguise and will attack you on sight.
  2. Mordenai gave you an item called Illidari Service Papers. Deliver these papers to Overlord Mor'ghor in the above mentioned camp. He can be found at (66,85). Upon completion you'll recieve 250 reputation with Netherwing.
  3. Accept [70] Enter the Taskmaster. Seek out Taskmaster Varkule Dragonbreath (who is just outside) and complete the quest. You are now ready to build reputation.
  4. Completing the above mentioned quest and another one outside at Yarzil the Merc ([70] Your Friend on the Inside) will enable you to do 3-4 daily quests (depending on how many gathering skills you have), to build faction. Each of these quests can only be completed once per day and you can only do 10 different daily quests per day. The daily quests (which you can obtain from Yarzil the Merc and the Taskmaster in the middle of the camp) are:

    [70] A Slow Death
    [70] Netherdust Pollen
    (herbalist only)
    [70] Nethermine Flayer Hide (skinners only)
    [70] Nethercite Ore (miners only)
    [70] Netherwing Crystals
    [70] The Not-So-Friendly Skies...
    [70] The Great Netherwing Egg Hunt
    Note: You can only complete one gathering quest along with the Netherwing Crystals quest daily.
  5. What to do:
    (In the following I'll describe a rather optimal daily quest path. You'll follow this path every day (with a few alterations later on). Memorize it well and don't forget to always get the quest first before you start out quest paths)
    ** Look out for Netherwing Eggs that sometimes spawn on the Netherwing Ledge, scroll down to the mines section for more info**
    ** For miners/herbalists: While completing the following steps be sure to loot any Netherdust Bush and/or Nethercite Deposit you find on your way**


    After accepting the above mentioned quests, fly to the main island of Shadowmoon Valley. Here, kill Felboars (click to see where they spawn) and Felfire Diemetradon (click to see where they spawn) until you collect 12 Fel Glands. If you are grouped and one of your group members has 4 Fel Glands while you have 8, you are still good to go to complete the quest for all of your group members. You just need 12 Fel Glands in total.
    Good spots to farm these items are 47,60 and 39,45. The drop rate seems to be approximately 40%.
  6. Next fly to the islands that are in this area:
    You'll see Dragonmaw Transporters pass by. There are 3 islands in this area where you can pull these dragons down. (one where they land and two where they pass by, all around 74,76) Kill them until you collect 10 Netherwing Relics.
    Another great spot to pull these is the Dragonmaw Fortress. Position yourself here:


    And pull the dragons like this:


  7. Go to Netherwing Ledge and search camps with orc peons. Have ONE of your group members use the Yarzill's Mutton near the peon camp (the other group members must be close). Wait until the peons eat the mutton and until you get the quest update. Complete this step 12 times in total. Be careful: If the orcs don't move (normally they mine the crystals) then they are bugged, don't place your mutton there. Also if the peons have blue icons over the head like Blind (or if they sleep), they are part of a different quest and won’t eat your mutton either.
  8. Exceptional step, won’t be repeated the next day: Seek out Arvoar the Rapacious (click on his name to see where he spawns). He looks like this:

    Kill him (he can be difficult for some classes to solo; best is you attempt this grouped with another player). Loot the item Partially Digested Hand from him.
    Right click the item and start the quest [70] A Job Unfinished. Group up with another person (you can try this solo, it's difficult though) and kill 10 Overmine Flayers and Barash the Den Mother. Both can be found close to where you killed Arvoar. The Den Mother spawns here:


    And looks like this:


  9. For herbalists: If at this point you don't have 40 Netherdust Pollen fly in cicles around Netherwing Ledge until you find 40 of them.
  10. Now go to the mines that are just below the Dragonmaw Base Camp and kill every mob that you see. If you are a miner loot every Nethercite Deposit you find. If you are a skinner kill every Nethermine Flayer on your way and skin it until you have:
    • 40 Netherwing Crystals
    • 40 Nethercite Ores (miners only)
    • 1 Netherwing Egg
    • 35 Nethermine Flayer Hides (skinners only)
  11. The Netherwing Egg drops of any mob/deposit/bush on Netherwing Ledge as rare drops. However they also spawn themselves all over the island, especially inside the mines. They look like this: You are not obliged to find one, but it gives you 250 extra reputation, which is quite nice. (so try!)
  12. Go back to the Dragonmaw Base Camp and turn in all your quests. Let's say you do not have any of the gathering skills (worst case) you'll be able to get 1350 reputation per day.
  13. Exceptional step, won’t be repeated the next day: [70] A Job Unfinished, upon completion, will enable you to choose between the following rewards: http://www.wowhead.com/?item=32866
    http://www.wowhead.com/?item=32867
    http://www.wowhead.com/?item=32865
    http://www.wowhead.com/?item=32868
    You are done for today!
  14. The next day: Repeat all the daily quests, just like the previous day in the same order (while skipping the exceptional steps). You'll make about 1000 rep if you do them all including the egg quest.
  15. The next day: same as above. On the third day, after obtaining the 1000 reputation, you'll manage to achieve Friendly rank.
    You will be 600 points into Frindly by the end of the thiis day and fel orcs beside Dragonmaw Ascendants, Dragonmaw Skybreakers and Dragonmaw Transporters will appear friendly to you.

FRIENDLY to HONORED (Day 4)
--------------
Shopping List:
10x Knothide Leather
--------------
  • Once you hit friendly talk to Taskmaster Varkule Dragonbreath. Accept the quest [70] Rise, Overseer!. He'll send you to speak with Overlord Mor'ghor at Dragonmaw Base Camp.

    He'll promote you to Overseer and he will also grant you a trinket that will enable you to summon a Netherwing Alley (only works in Shadowmoon Valley, outdoors) to fight for you, every 10 minutes.
    http://www.wowhead.com/?item=32694
  • Now next to the already known daily quests, you should have the following new quests available:
    [70] Overseeing and You: Making the Right Choices
    [70] The Netherwing Mines

    Accept them both.
  • Make sure you've bought or skinned the Knothide Leather already, if you haven't please do it on the way. Fly to Netherstorm. We are searching for a huge raptor called Tyrantus. He can be found here:


    and he looks like this:


    He has a short spawntime and is easily soloable, kill him and loot Hardened Hide of Tyrantus.
  • Fly back to Netherwing Ledge in Shadowmoon Valley. Go back to the Dragonmaw Base Camp. Turn in [70] Overseeing and You: Making the Right Choices. (you can already take the follow up but I included this step in the next part because it will be repeated daily)
  • Go to the entrance of the Netherwing Mines and talk to the Mistress of the Mines. She spawns at 65,90. Talk to her and complete the quest [70] The Netherwing Mines. (You can already accept the follow up, however I put this step in the next part as it will be repeated daily)
  • Repeat the daily quests from the previous chapter, in exactly the same order. However you'll add the following steps:
    • From Chief Overseer Mudlump accept:
      [70] The Booterang: A Cure For The Common Worthless Peon
      (daily quest)
    • While searching peons to poison with your mutton, also search for blinded, sleeping and red peons. Use the Booterang on them that you've received from your quest giver. Please note, you can do this from your flying mount and don't need to wait for the result. You need to discipline 20 peons like this.
    • Before entering the mines to hunt mobs there: Take quest called [70] Picking up the Pieces... from the Mistress of the Mines. This is a new daily quest. Also get the following quest:
      [70 Daily] Dragons are the Least of Our Problems (daily quest, from Dragonmaw Foreman who stands between the two entrances of the mine, I think there are two of them patroling)
    • While hunting mobs in the mines, loot any Nethermine Cargo on the way. They look like this:


      Do this until you've got 15 Nethermine Cargo.
    • Before, it didn't matter which mobs you killed (in the mines) in order to obtain your crystals, now it will matter and we'll define a clear killing path. First, have a look at this map:

      You'll enter the mines where you can see the two little yellow dots next to "First Floor". They actually mark finished quests at the Mistress of Mines and Dragonmaw Foreman as I was a step ahead already at that point. Before we do anything, we are going to go to point (1), indicated on the map. While running use the rail bridges. Point (1) is what we'll refer to as Main Room. Now jump down from the rail tracks and you'll be on the ground floor. (there will be a lot of Oozes around you etc.). Go to point (2) on the map.
    • Exceptional step, won’t be repeated the next day: Get the quest [70] Crazed and Confused from Ronag the Slave Driver whom you'll find at point (2).

    • Now look at the map again and check out where the red arrow is. This is the path up to the second floor. First go left of point (3) and kill 15 Nethermine Flayers and 5 Nethermine Ravagers.
    • This is an exceptional step and won’t be repeated the next day: When you are done killing Flayers and Ravagers, go back to point (3) and go on the right side, towards point (4). Kill the Crazed Murkblood Foreman and 5 Crazed Murkblood Miners[/b] on your way. When you are done, jump down at point (4) and turn in [70] Crazed and Confused at Ronag the Slave Driver.


    • This is an exceptional step and won’t be repeated the next day: Go back to the main room and on to the first floor in direction entrance while killing every Ooze on your way. Their Sludge-covered Objects can contain a quest item: Murkblood Escape Plans. Right-click it and start the quest.
    • When you are done with crystals, cargos and killing Flayers/Ravagers (etc.), turn in [70] Dragons are the Least of Our Problems at Dragonmaw Foreman for 350 reputation. Also turn in [70] Picking up the Pieces... at the Mistress of the Mines for 350 reputation.
    • This is an exceptional step and won’t be repeated the next day: Also at the Mistress of Mines turn in [70] The Great Murkblood Revolt and take the follow up [70] Seeker of Truth Seek out a Murkblood Overseer (They can be found at 73,82 and are hiding in the little alcoves behind a mining machine, in the upper corners of the second floor) and interrogate one of them. Return to the Mistress of Mines with the Hand of the Overseer. Turn the quest in for 500 reputation points. (note that you can also do this step the next day while you kill Flayers/Ravagers for more efficiency, since it's only a one time quest)

    • While back at the Dragonmaw Base Camp, turn in [70] The Booterang: A Cure For The Common Worthless Peon for 350 reputation points.

  • Completing all those quests should have given you approximately 2250 points of reputation. Along with the old daily quests (1000 rep) that makes 3250 reputation points. This means that you should be at approximately 4425 reputaion into Friendly.
  • The next day: Do all the available daily quests as described above. This will bring you approximately 2050 reputation and will make you hit Honored with 475 reputation points into Honored.

HONORED to REVERED (Day 6)
------------------
Shopping List:
2 x Felsteel Bar
Adamantite Frame
Khorium Power Core

-------------------
  • Once you are honored, speak to Taskmaster Varkule Dragonbreath and accept the quest [70] Stand Tall, Captain! . He'll send you to speak with Overlord Mor'ghor. Go to him and complete the quest to receive 500 reputation and the http://www.wowhead.com/?item=32695. The Trinket summons equally strong Dragon allies as the last one, but now it's usable outside of Shadowmoon Valley as well. (only outdoors though, which also excludes arenas)
  • Three new quests should be available:
    • [70 Daily] Disrupting the Twilight Portal (from Overlord Mor'ghor)
    • [70] The Soul Cannon of Reth'hedron (from Illidari Lord Balthas)
    • [70] Earning Your Wings... (from Ja'y Nosliw, who is all around Netherwing Ledge)

  • Accept them all and turn in the last one (earning your wings) right away and accept the follow up [70] Dragonmaw Race: The Ballad of Oldie McOld.
  • The Dragomaw Race quests (there are several) require you to ride your mount (which is a dragon on the Netherwing Ledge) and stay on its back, while following one of the quest givers (who throws stuff at you). These quests are not as easy as they sound and chances are you WILL get thrown off the dragon's back at one point or the other (a.k.a die). So make sure to bag your gear (or bank it whatever) from the 4th race quest on and do those quests naked. This will save you a whole lot of repair money. While riding your mount and following the quest giver, he will throw stuff at you. You must follow the NPC while dodging the things thrown/shot at you.
    In the first quest he throws pumpkins. They hurt quite a lot but if they hit you, you won’t fall off your mount. So for this one it might be better to keep your gear on, however given the fact that you'll have to learn dodging anyway, because of the following quests, you better try to get through without being hit.
    One thing to be really careful of is the Dragonmaw Skybreakers. Those will attack you during the quest, so always keep your distance and be conscious of your environment.


    I've found out that for dodging, the following tips are helpful:
    • Turn off your interface with alt+z (you'll see much better, can turn it back on with alt+z)
    • Scroll back with your mouse wheel until you have the largest possible field of vision.
    • While flying use straft to go sideways. You can go to keybindings (in your options menu) and bind straft to your directional keys instead of turn left/right. This will permit you to dodge left and right while still LOOKING at the mob.
    • Do not fall back too much, or you'll get a quest failed message.
    • If you are grouped with someone, don't do the quest together, you'll hinder each others sight and one point or the other.
    • Keep moving. The NPC shoots the ammo directly at you, however if you keep moving, it becomes close to impossible to target you in the air.
    • Mostly try to dodge things sideways while following the quest NPC, though you can also dodge moving up and down. Make use of the free navigation you have whilst in air.
    • If you have mount speed increasing enchants or items, use them (like http://www.wowhead.com/?item=11122). They will help greatly. However you should not purchase a http://www.wowhead.com/?item=25653 for this quest. Even though it would certainly help, the reward at the end is an item equal to Riding Crop, so rather spend a bit more time on the quests, but get a "Crop" for free at the end Smiling
  • After completing the first quest, take the follow up [70] Dragonmaw Race: Trope the Filth-Belcher. This time the NPC will shoot poison missiles at you. They are rather easy to dodge, just do as described above while always fixing your eyes on the NPC and keeping your distance.

  • After completing this quest, take the follow up [70] Dragonmaw Race: Corlok the Vet. This one will shoot rocks at you, still rather easy, do as described above.

  • After completing this quest, take the follow up [70] Dragonmaw Race: Wing Commander Ichman. This is where things get more complicated. The NPC will shoot rotating fire missiles at you that go in several directions at once. This is also the first quest where being hit throws you directly off the mount.
    Be sure to remove your equipment while you try to follow him and again, keep your distance. If you follow the advice given above, you should get the hang of it quite fast.

  • After completing this quest, take the follow up [70] Dragonmaw Race: Wing Commander Mulverick.

    (editor's note: nice to see Tom Cruise as Orc, certain might know what I mean by that Sticking out tongue)
    This one is quite difficult. It might take you up to an hour or so to complete this. The laser like missiles that he shoots really go in all directions and are extremely hard to dodge because depending on lag, latency or gfx glitches you will see the lasers go in a certain direction and you'll think you are safe, but actually they'll still hit you a second later and throw you off your mount. Check this video of a successful attempt, again distance seems to be the key.
    http://www.youtube.com/watch?v=UX0yysWOtMc
  • After completing this quest, accept the last quest: [70] Dragonmaw Race: Captain Skyshatter.

    This is slightly easer (in my opinion) than the previous quest, a few tips for making it:
    This NPC is different from the other ones because you need to stay MUCH closer to him while following, or he'll despawn. He will shower you with meteors, but if you managed to dodge Mulverick's attacks, dodging these things is really easy, you just need to stay withing 15 yards and keep strafting left or right while always looking at the mob and the meteor showers. The difficulty lies in following him because he flies really fast. This is the only quest where not having a http://www.wowhead.com/?item=25653 will give you a clear disadvantage, but it is certainly possible to manage without so keep trying.
    Also don't fly directly next to Captain Skyshatter because he'll sometimes hit himself with a meteor and the flames caused this way will burn you too. (Be sure to dodge the meteors AND the flames they cause in the air)
    Anyway, again a video speaks more than a hundred words, check it out:
    http://www.youtube.com/watch?v=Rq87HikhdNo
    After turning in the quest you'll get 1000 reputation and http://www.wowhead.com/?item=32863. The whip of course doesn't stack with any other mountspeed increasing items. (basically the same thing as Riding Crop)
  • Go to Terrokar Forest and seek out Sar'This. He is at 42,44.

    The NPC will spawn 5 elementals of different elements and you need to kill them while following Sar'This around. They are fairly easy and can be soloed. The fifth one (Arcane) has the Flawless Arcane Essence we seek.


  • Fly back to Netherwing Ledge (though make sure you bought or made all the items on the shopping list!). Turn in [70] The Soul Cannon of Reth'hedron at Illidari Lord Balthas (500 rep) and take the follow up [70] Subdue the Subduer.
  • Take the cannon and fly to the Twilight Ridge in western Nagrand. Find Reth'hedron at 9,42. He's huge actually, you can't miss him.

    Now proceed in the following way:
    (thanks to Lastemperor of wowhead for the info):
    Really easy one. Drain his health down while you are in the air with your flying mount. Avoid meteors/fireballs.
    The tactic I used is basicly staying in range, above him, flying around him clockwise while draining his soul. This way you will only take the shadow bolt damage (800ish). If you get cripple on you start going anti clockwise, so you dont run into the fireballs. The fireballs really hurt also dismounts you, and you die. Will take you a while till you suck his soul out, once hes on 1% hes starting to walk to the portal and leaves the place.
    If you seem to take too much damage during an attempt you can flee away by just flying far from him.
    Fun quest, good luck on it!
    Now on to the daily quests:
  • Before you start them and while still in Nagrand on the Twilight Ridge, kill 20 (Deathshadow) Acolytes, Spellbinders, Archons. Be careful when you pull here though, there are elite ogres roaming. (very tough to solo)
  • Do your daily quests, as described above. From now on there is (without gathering skills) 7 quests (+ the egg quest). Always start out the quests by going to Nagrand first and killing the Deathshadow Agents.
  • Exceptional, won’t be repeated the other days: After you are done with the daily quests and while turning them in, also turn in [70] Subdue the Subduer. You'll be able to choose one of the following rewards:
    http://www.wowhead.com/?item=32871
    http://www.wowhead.com/?item=32869
    http://www.wowhead.com/?item=32872
    http://www.wowhead.com/?item=32870
  • On the sixth day you should have earned a total of (at least) 7250 reputation. This means you'll be approximately 7825 points into Honored.
  • The next day: Do all the daily quests available to you. Which should earn you 2550 points.
  • On the 8th day, after doing your daily quests and earning another 2550 points, you should ding Revered with 925 points already into Revered.
  • As soon as you are revered, talk to Taskmaster Varkule Dragonbreath and accept the quest [70] Hail, Commander!. Complete the quest at Overlord Mor'ghor, you'll recieve a new badge: http://www.wowhead.com/?item=32864 as well as 500 reputation.
  • Now I'll describe two different quest paths, depending on if you are Scryers or Aldor.
    • Scryers Accept [70] Kill Them All! from Overlord Mor'ghor. He'll send you to Arcanist Thelis at the Sanctum of the Stars in Shadowmoon Valley.
      Turn the quest in (+250 rep) and accept the follow up [70] Commander Hobb. You can turn in this quest already at Commander Hobb who is just outside the tent, but before you accept the follow up, you'll need someone to group up with. Minimum for this quest is two players I'd say but without a healer it can sometimes get tough if you are only two, so try to be at least 3 players and possibly take a healer with you. Also the other players should be Scryers in faction as well. If they are Aldor the quest NPCs will attack them. Last but not least, take RANGED DPS with you as the dragons cannot be meleed.
      After you've set up your group, get [70 Daily] The Deadliest Trap Ever Laid (Scryer). The NPC will run just outside the gates of the Altar of Stars and will join up with a few NPC archers.

      Next, dragons will attack the NPCs and you'll need to help the NPCs kill them. At first stay back though and let the NPCs get the initial aggro as you'll easily die taking damage from all dragons at once.
      Help the NPCs take down the dragons while trying to stay alive. Two things:
      - You won’t fail the quest if you die, you'll appear at the graveyard which is just next to the battlefield and you can raise up right away. You must just not die when the quest update is given.
      - You don't need to kill all dragons. You just need to help killing them while keeping the main quest NPC (Commander Hobb) alive. After a certain time, even if there are still dragons up, you'll get a quest complete message.
      Once you are done, return to the Netherwing Ledge and turn in the quest at Overlord Mor'ghor for 500 reputation.
    • Aldor Accept [70] Kill Them All! from Overlord Mor'ghor. He'll send you to Anchorite Ceyla at the Altar of Sha'tar in Shadowmoon Valley.
      Turn the quest in (+250 rep) and accept the follow up [70] Commander Arcus. You can turn in this quest already at Commander Arcus who is just outside, but before you accept the follow up, you'll need someone to group up with. Minimum for this quest is two players I'd say but without a healer it can sometimes get tough if you are only two, so try to be at least 3 players and possibly take a healer with you. Also the other players should be Aldor in faction as well. If they are Scryers the quest NPCs will attack them. Last but not least, take RANGED DPS with you as the dragons cannot be meleed.
      After you've set up your group, get [70 Daily] The Deadliest Trap Ever Laid (Aldor). The NPC will run just outside the gates of the Altar of Sha'tar and will join up with a few NPC archers.

      Next, dragons will attack the NPCs and you'll need to help the NPCs kill them. At first stay back though and let the NPCs get the initial aggro as you'll easily die taking damage from all dragons at once.
      Help the NPCs take down the dragons while trying to stay alive. Two things:
      - You won’t fail the quest if you die, you'll appear at the graveyard which is just next to the battlefield and you can raise up right away. You must just not die when the quest update is given.
      - You don't need to kill all dragons. You just need to help killing them while keeping the main quest NPC (Commander Arcus) alive. After a certain time, even if there are still dragons up, you'll get a quest complete message.
      Once you are done, return to the Netherwing Ledge and turn in the quest at Overlord Mor'ghor for 500 reputation.
  • _____________________ As you might have already guessed, this is a new daily quest and you should try to do this every day as this quest gives really nice reputation. However I didn't include it in a specific order into the daily quest path as you might get troubles finding people to do this quest with, so just do it whenever it suits you and whenever you find the players to do it with. After completing this quest you should be 1425 points into Revered.
  • From now on, if you complete all the daily quests and if you either turn in one egg per day or turn in one of the gathering quest, you should be able to gain 3050 reputation points per day. This means that it will take you seven more days to achieve exalted with the Netherwing

EXALTED (Day 15)
  • Now comes the fun part Smiling (I'm not at this stage of the quest yet, but I'll add screenshots as soon as I do it myself)
  • Speak with Taskmaster Varkule Dragonbreath and accept the quest [70] Bow to the Highlord. Turn it in at Overlord Mor'ghor and accept the quest [70] Lord Illidan Stormrage. Mor'Gor will now walk out and summon Illidan for you (yay!) and Illidan will immediately see behind your disguise. He'll also order Mor'Gor to kill you. In that moment a Netherwing Dragon will come and pick you up to save you. It will also fly you to Shattrath Smiling
  • At Shattrath, speak with Barthamus in the Lower City and turn in [70] Lord Illidan Stormrage (+1k rep).
  • Now you'll be able to talk with ONE of the dragons next to the quest NPC. Upon completion you'll receive that dragon as your mount, so choose wisely!

Congratulations, you are now poud owner of a Netherwing mount! Also you made about 3k gold in the process Eye
Thanks for reading the guide, if you liked it please make sure to link it to your friends/guild/etc.
Copyright @ WoW-Pro.